

Agent based Scanning
Use pd-agent for seamless internal scanning through our platform. Perfect for large networks and centralized security management.
Local Scanning & Upload
Run Nuclei locally and upload results to PD’s platform. Ideal for teams with existing scanning workflows or specific network restrictions.
Internal scanning helps identify misconfigurations, unpatched systems, and security gaps that could be exploited for lateral movement before attackers can leverage them.
Method 1: Agent based Scanning (Recommended)
To use this feature you’ll need to install and deploy pd-agent within your internal network. The agent acts as a bridge between your internal infrastructure and ProjectDiscovery’s platform, enabling you to trigger and manage scans remotely.What is pd-agent?
pd-agent is a lightweight agent that you deploy within your internal network to execute scans and enumerations remotely. It establishes a secure outbound connection to ProjectDiscovery’s platform, receives scan configurations, and runs them locally. Nuclei, httpx, naabu, dnsx, and tlsx are all built into the agent — there’s nothing else to install on the host, and nothing in your network needs to be exposed publicly. Key Capabilities:- Multi-Tool Scanning: Runs Nuclei, httpx, naabu, dnsx, and tlsx — vulnerability scanning, port discovery, HTTP probing, DNS enumeration, and TLS inspection, all from a single agent
- Network Discovery: Automatically discovers the host’s subnets on registration. Inside Kubernetes it discovers node IPs, pod CIDRs, and service CIDRs and reports them to the platform
- Vulnerability Scanning: Execute Nuclei-based scans using templates from the ProjectDiscovery platform
- Network Routing: Assign each agent a network name (
-agent-network) to route scans to specific sites, data centers, or VPCs - Parallel Execution: Splits each scan into chunks and runs them concurrently, auto-tuning parallelism to the host’s available CPU for faster completion
Agent based internal scanning is an Enterprise-exclusive feature. Free users can still perform internal scans using the local scanning method described below.
System Requirements
The agent is designed to be lightweight and efficient. Minimum recommended specifications for optimal performance:
The agent is designed to be lightweight and efficient. Minimum recommended specifications for optimal performance:
- CPU: 2 vCPU
- Memory: 4GB RAM
- Network: 100Mbps network interface
- Storage: 10GB available disk space
- Operating System: Linux (recommended), macOS, or Windows
Step 1: Create a Network
Before installing the agent, you need to create a network in the ProjectDiscovery’s platform. Each network represents a distinct internal environment (e.g., production, staging, office network) and generates a unique agent configuration.- Navigate to https://cloud.projectdiscovery.io/internal-network
- Click “Create Network”
- Provide a network name
- Save the network to generate your unique agent installation command
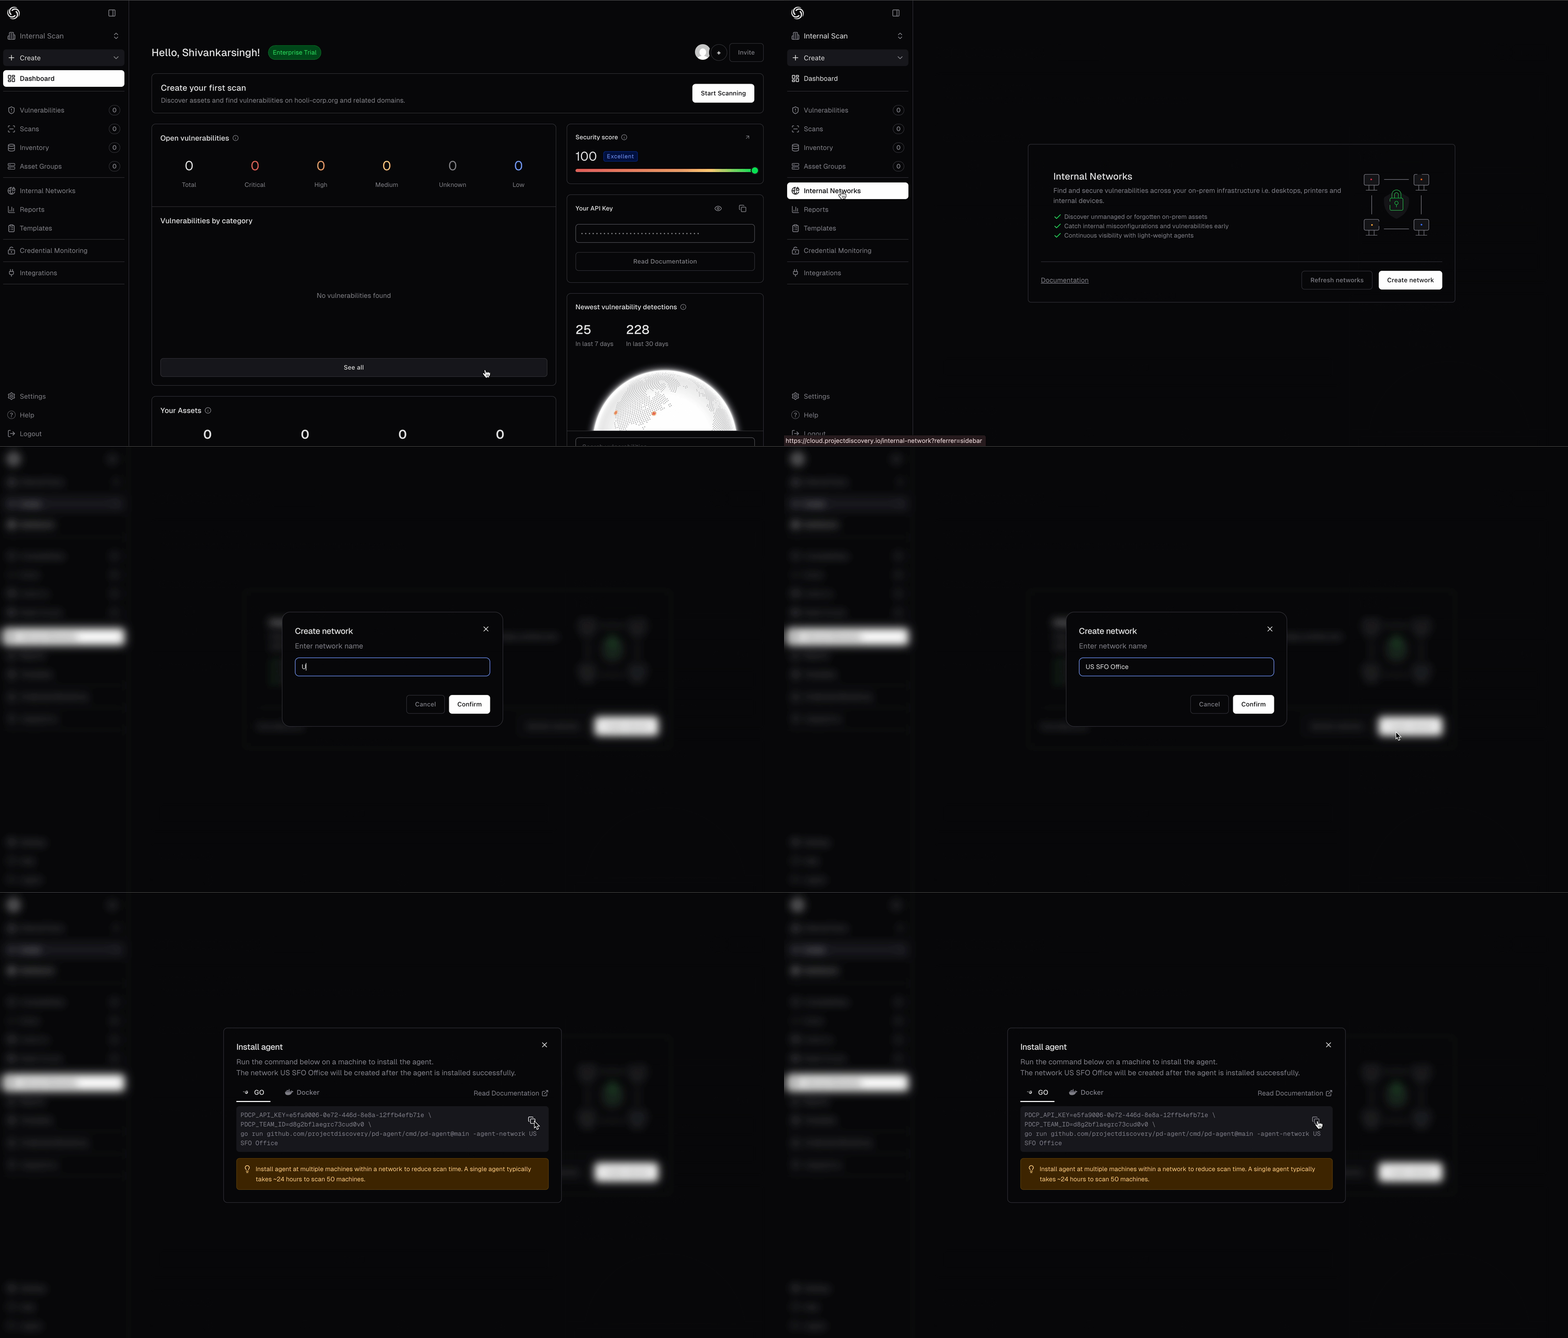
You can create multiple networks for different environments or network segments. Each network can have one or more agents deployed.
Step 2: Install the agent
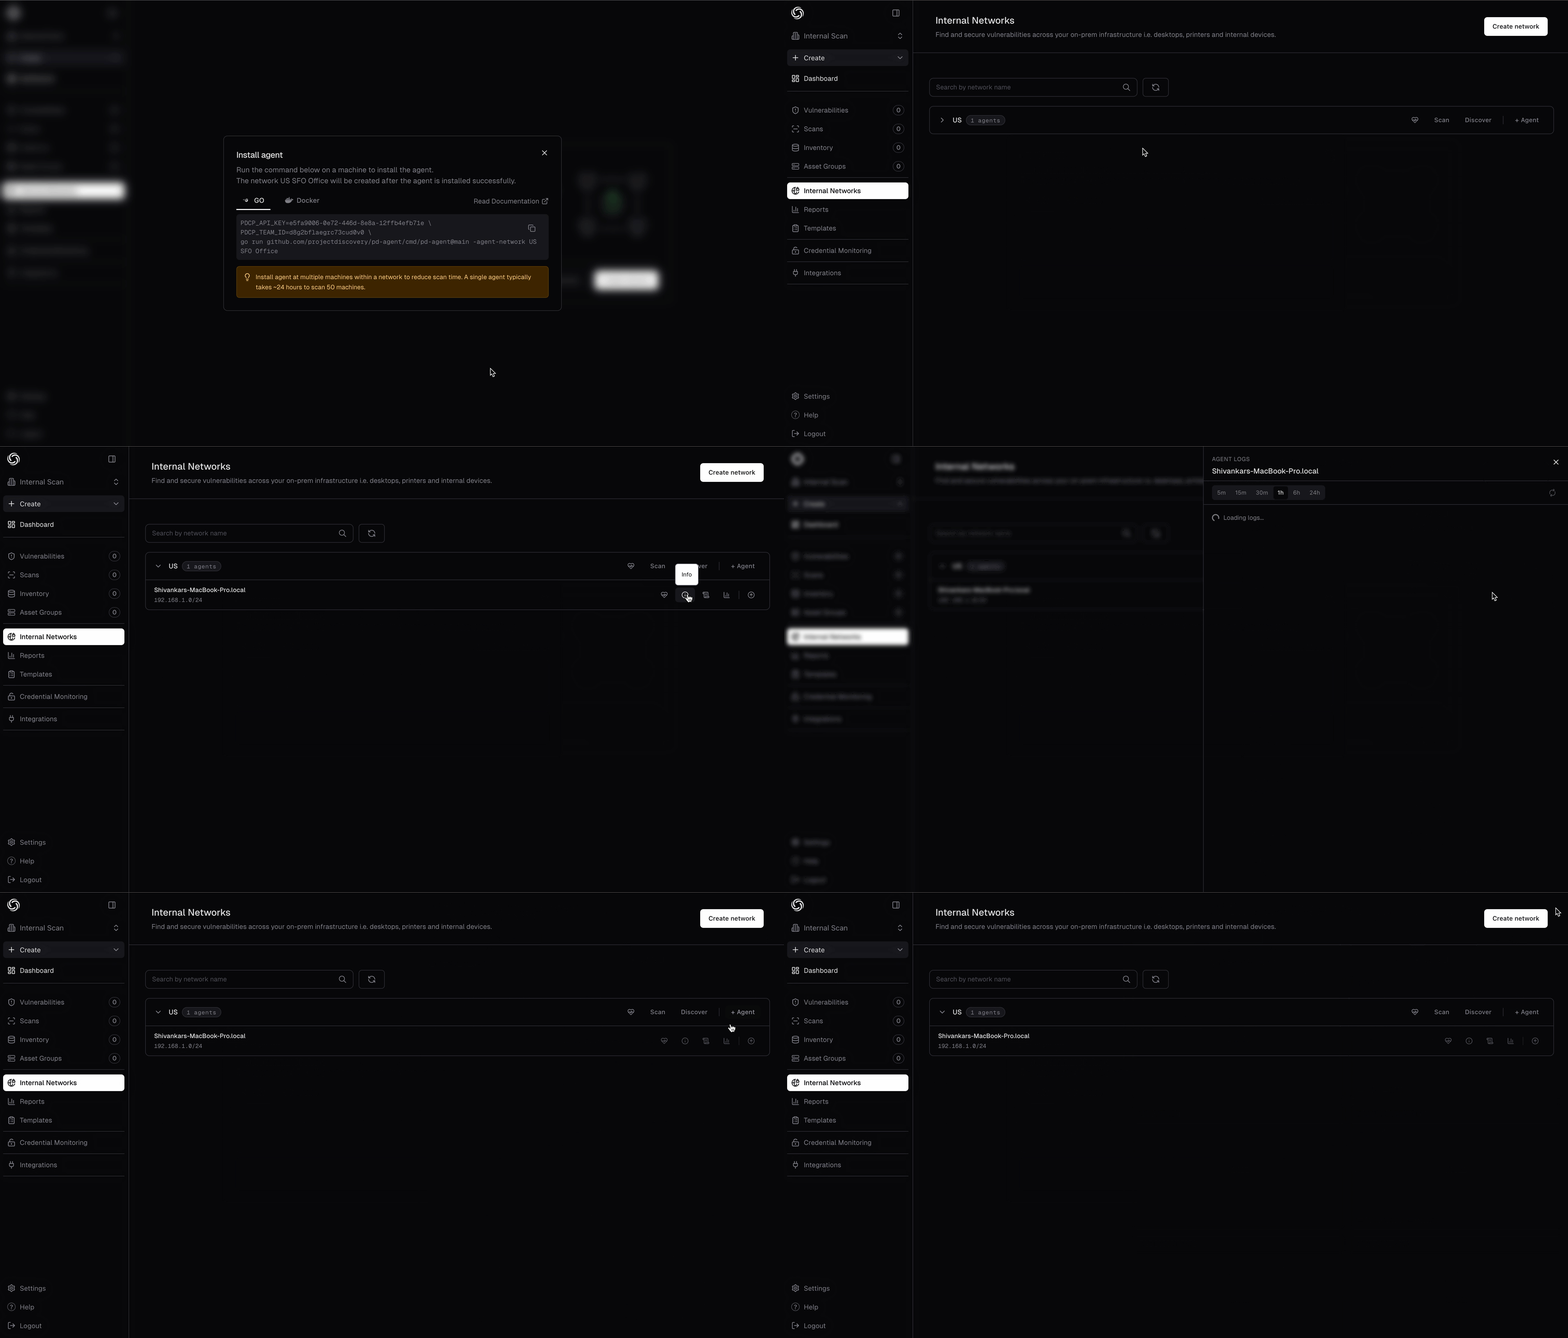
After creating your network, the platform displays a ready-to-run installation command pre-configured with yourPDCP_API_KEY, PDCP_TEAM_ID, and network name. Copy it and run it on a machine inside the network you want to scan.
- GO
- Docker
If you have Go installed, you can run the agent directly:
PDCP_API_KEYandPDCP_TEAM_IDare set as environment variables to authenticate with the platform.-agent-networkis the routing label scans are dispatched to — give each network a distinct name.
Step 3: Discover Assets
Before running vulnerability scans, you can discover assets in your internal network. This helps you identify all hosts, services, and open ports that the agent can reach.- Navigate to your networks dashboard at https://cloud.projectdiscovery.io/internal-network
- Locate the network you want to discover assets for and click the Discover assets button under the Action column
- Configure your discovery parameters (target ranges, ports, discovery methods, etc.)
- Click on Start Discovery to initiate the discovery process. The pd-agent will scan your internal network and discovered assets will appear in your asset inventory
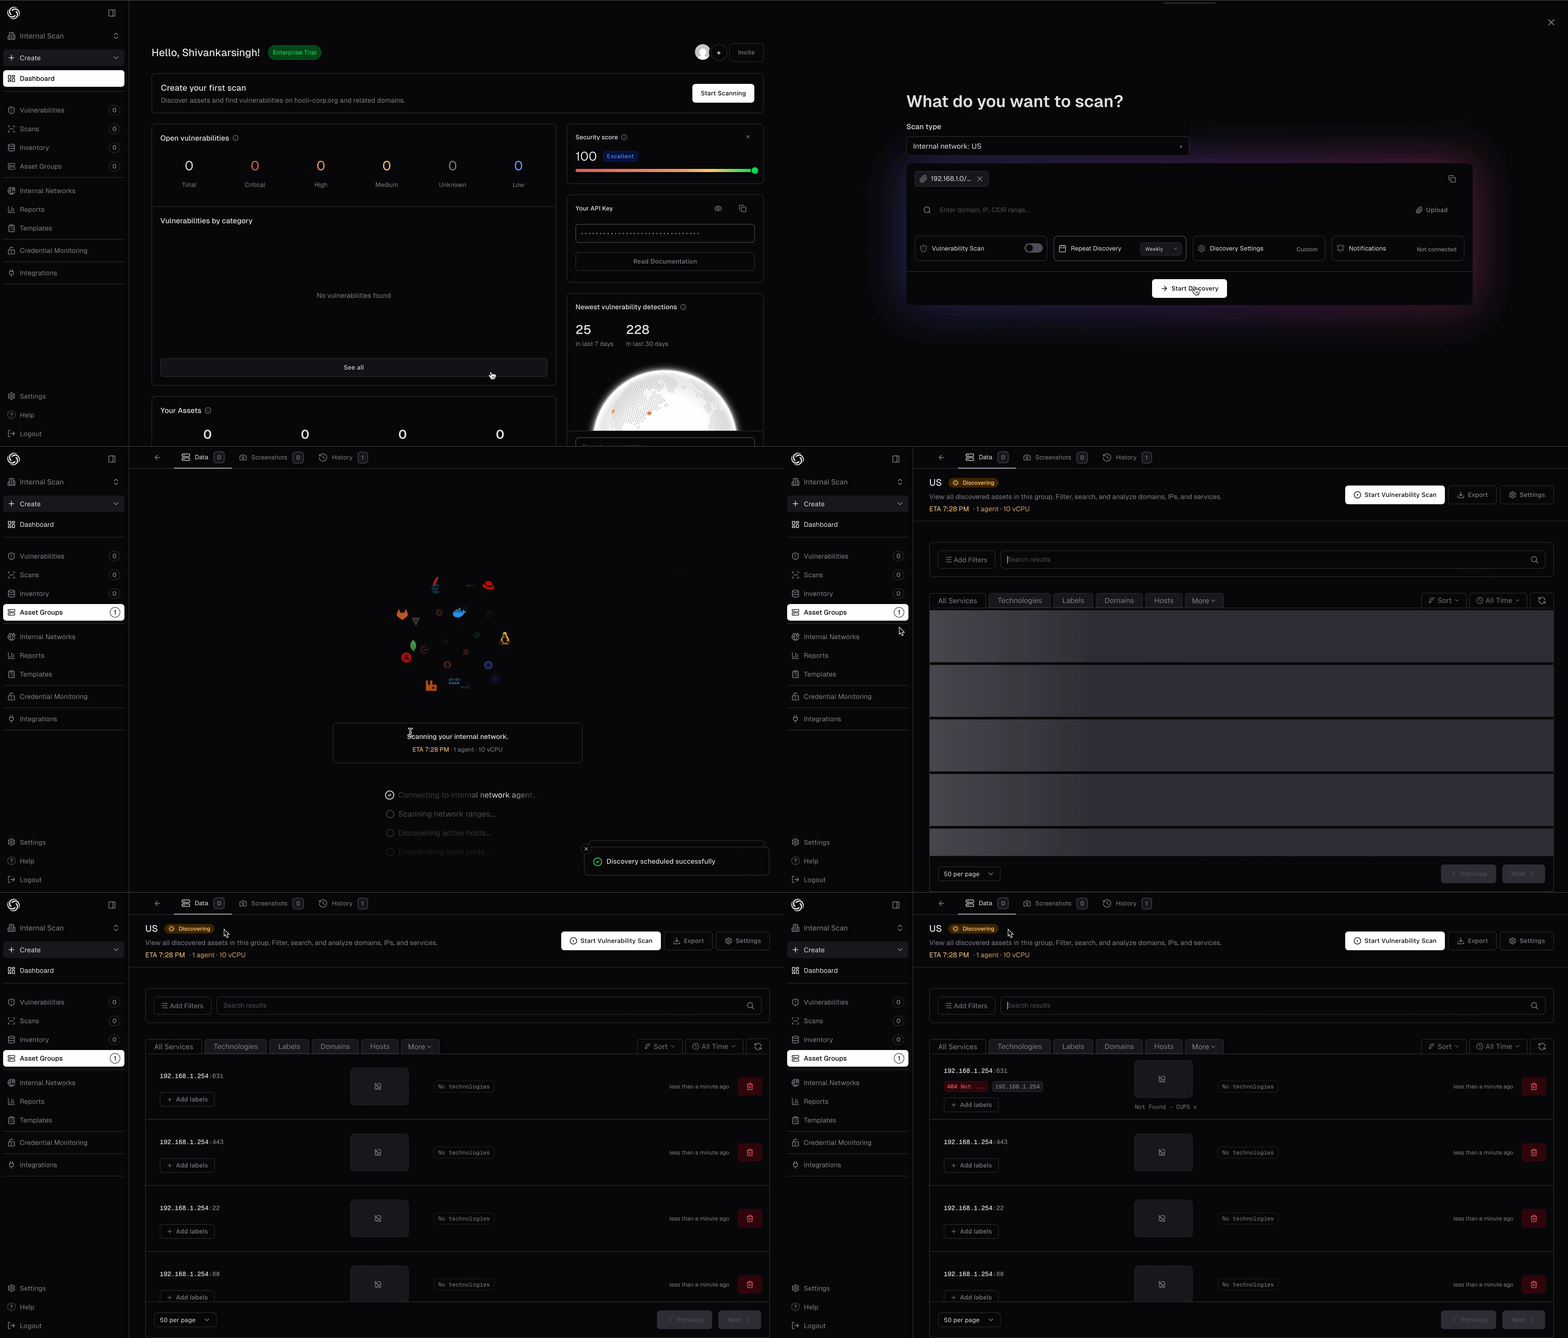
Asset discovery helps you build an accurate inventory of your internal infrastructure before running targeted vulnerability scans. This ensures comprehensive coverage of your attack surface.
Step 4: Trigger Internal Scans
Once your pd-agent is connected and assets are discovered (optional), you can trigger vulnerability scans. The workflow is identical to external scanning - configure scans through the same interface and view results in the same dashboard.- Click on the Scan button for the network you want to scan, or go to the Scans menu (https://cloud.projectdiscovery.io/scans) and click Create New Scan, choose Internal followed by the network
- Select the Asset Group created from the previous discovery operation, or manually enter your targets (internal IPs, hostnames, or CIDR ranges like
192.168.1.0/24,internal-server.local) - Select Nuclei templates (CVEs, misconfigurations, vulnerabilities, etc.) and configure scan settings (rate limits, headers, parameters). If the network contains printers, OT controllers, or other embedded devices, review Safety Considerations first
- Click Create Scan to start - the agent runs the scan locally using its embedded toolset (nuclei, httpx, naabu, dnsx, tlsx) and streams results back to your dashboard
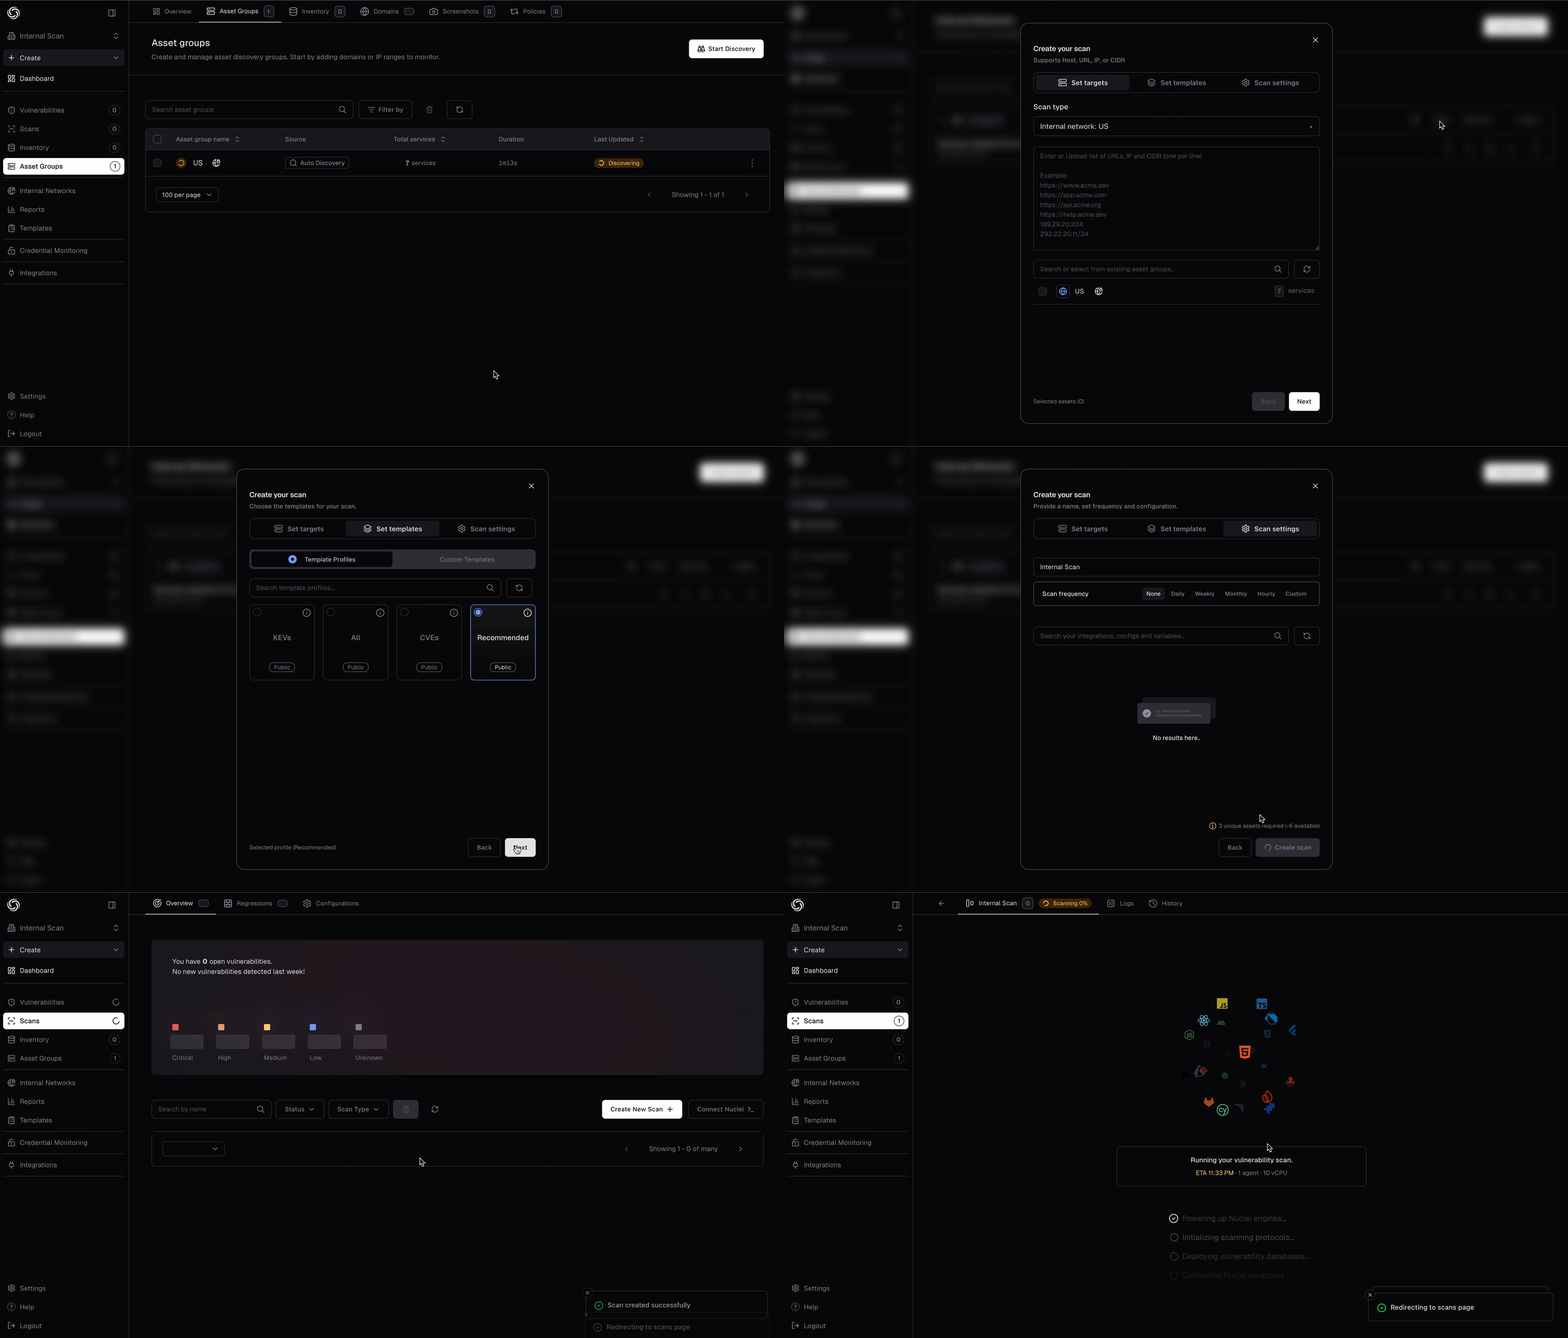
Internal scanning provides the same experience as external scanning - identical template selection, scan configuration, results viewing, retesting capabilities, and integration options.
Important: Only input targets that are accessible from where pd-agent is deployed. If the agent is running on a server in your 192.168.1.0/24 network, it can only scan hosts within that network or other networks it has routing access to.
Method 2: Local Scanning & Upload
This approach lets you run Nuclei locally and upload results to ProjectDiscovery Cloud Platform (ProjectDiscovery).Set up your API Key
To connect your existing Nuclei results to PDCP you will need to create a free API Key:- Visit https://cloud.projectdiscovery.io
- Open the setting menu from the top right and select “API Key” to create your API Key
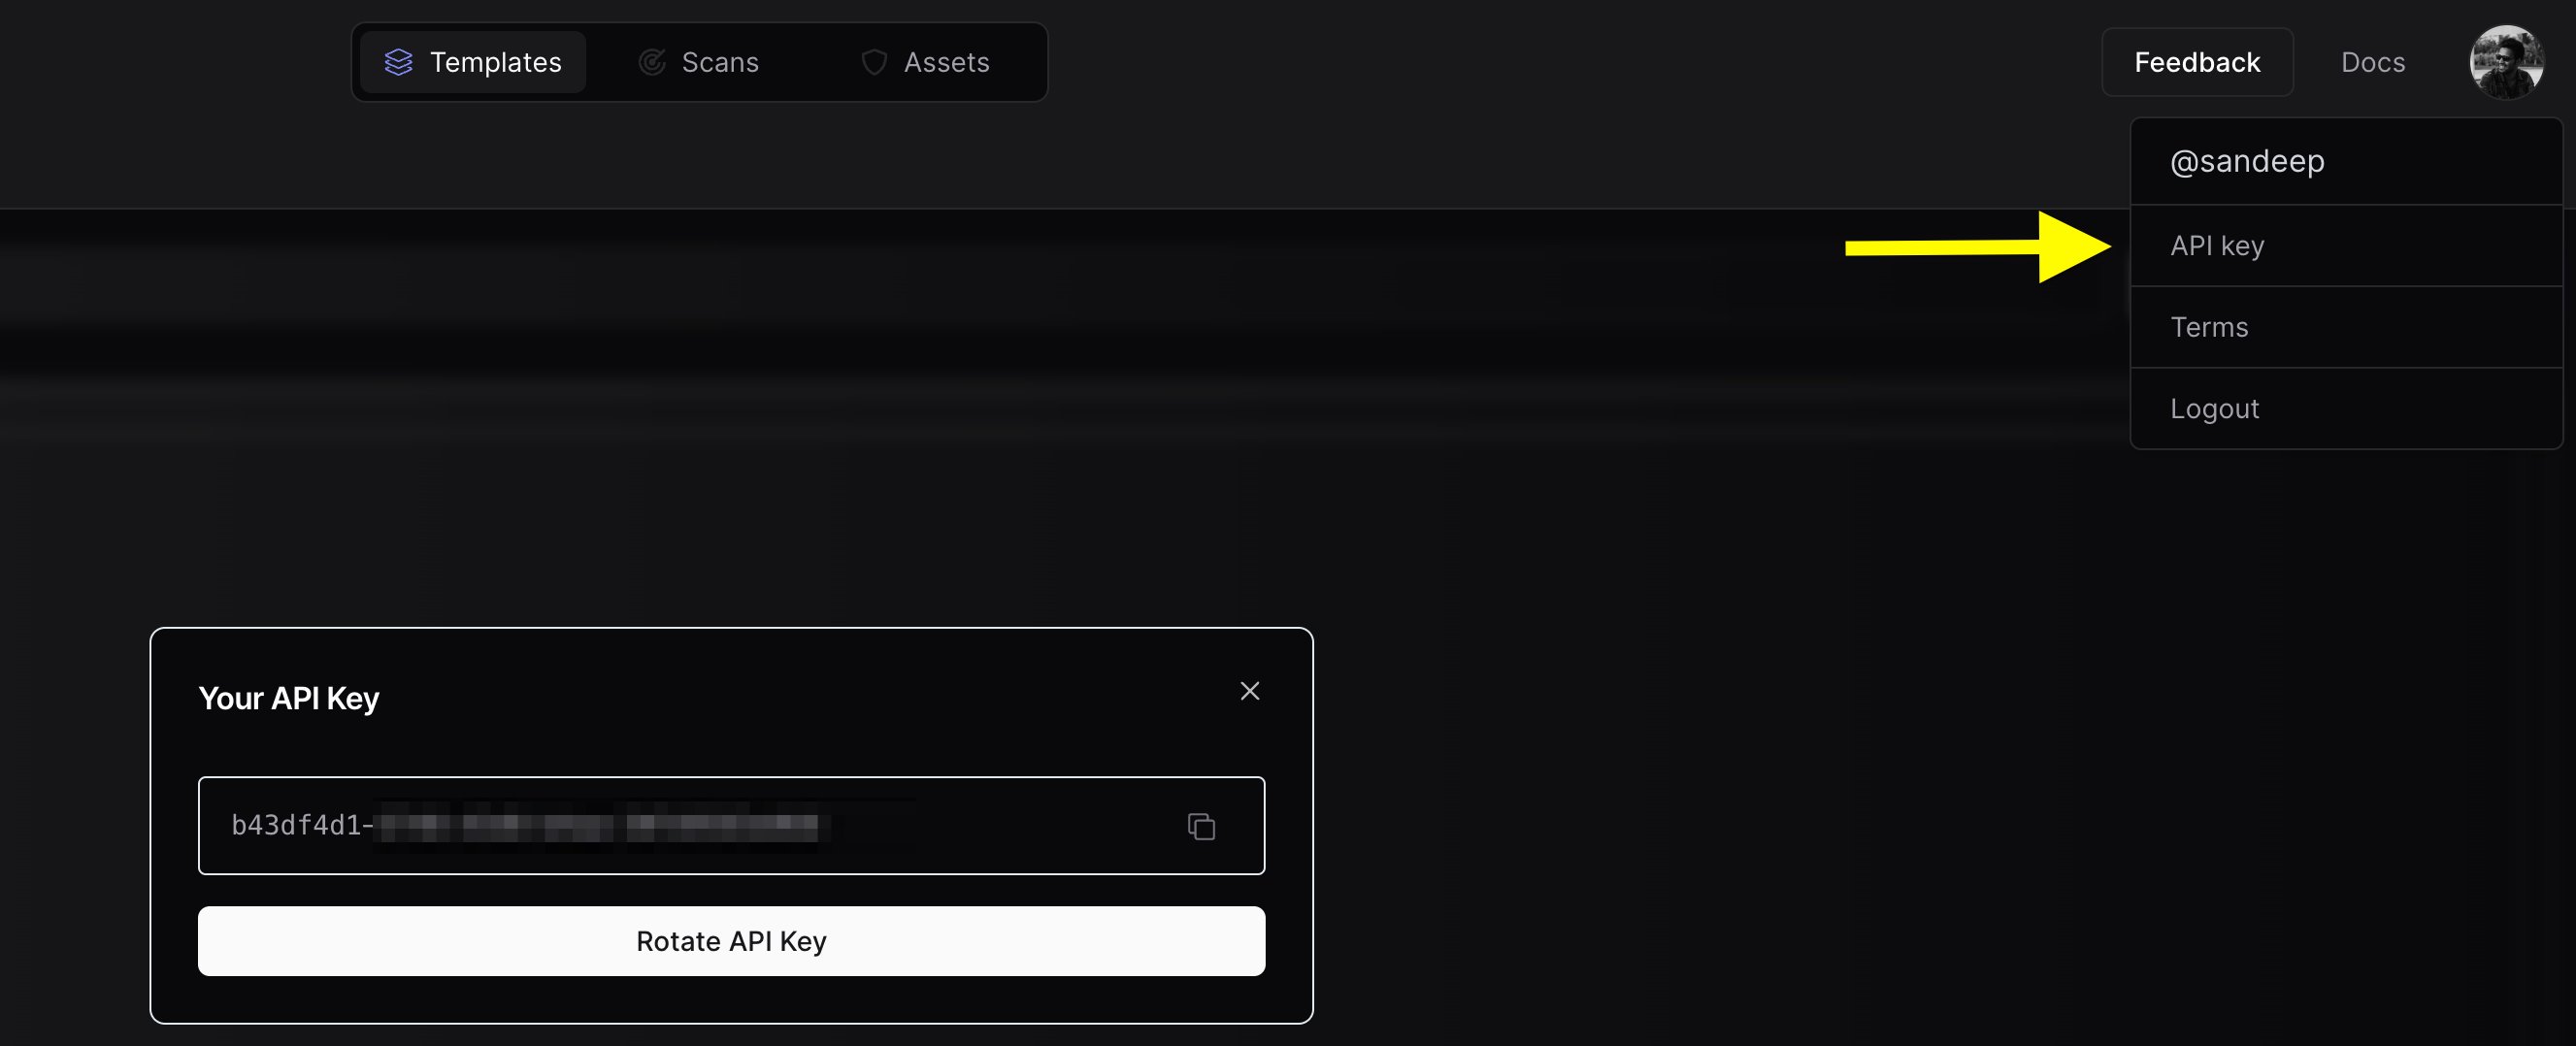
- Use the
nuclei -authcommand, and enter your API key when prompted.
Configure Team (Optional)
If you want to upload the scan results to a team workspace instead of your personal workspace, you can configure the Team ID using either method:-
Obtain Team ID:
- Navigate to https://cloud.projectdiscovery.io/settings/team
- Copy the Team ID from the top right section
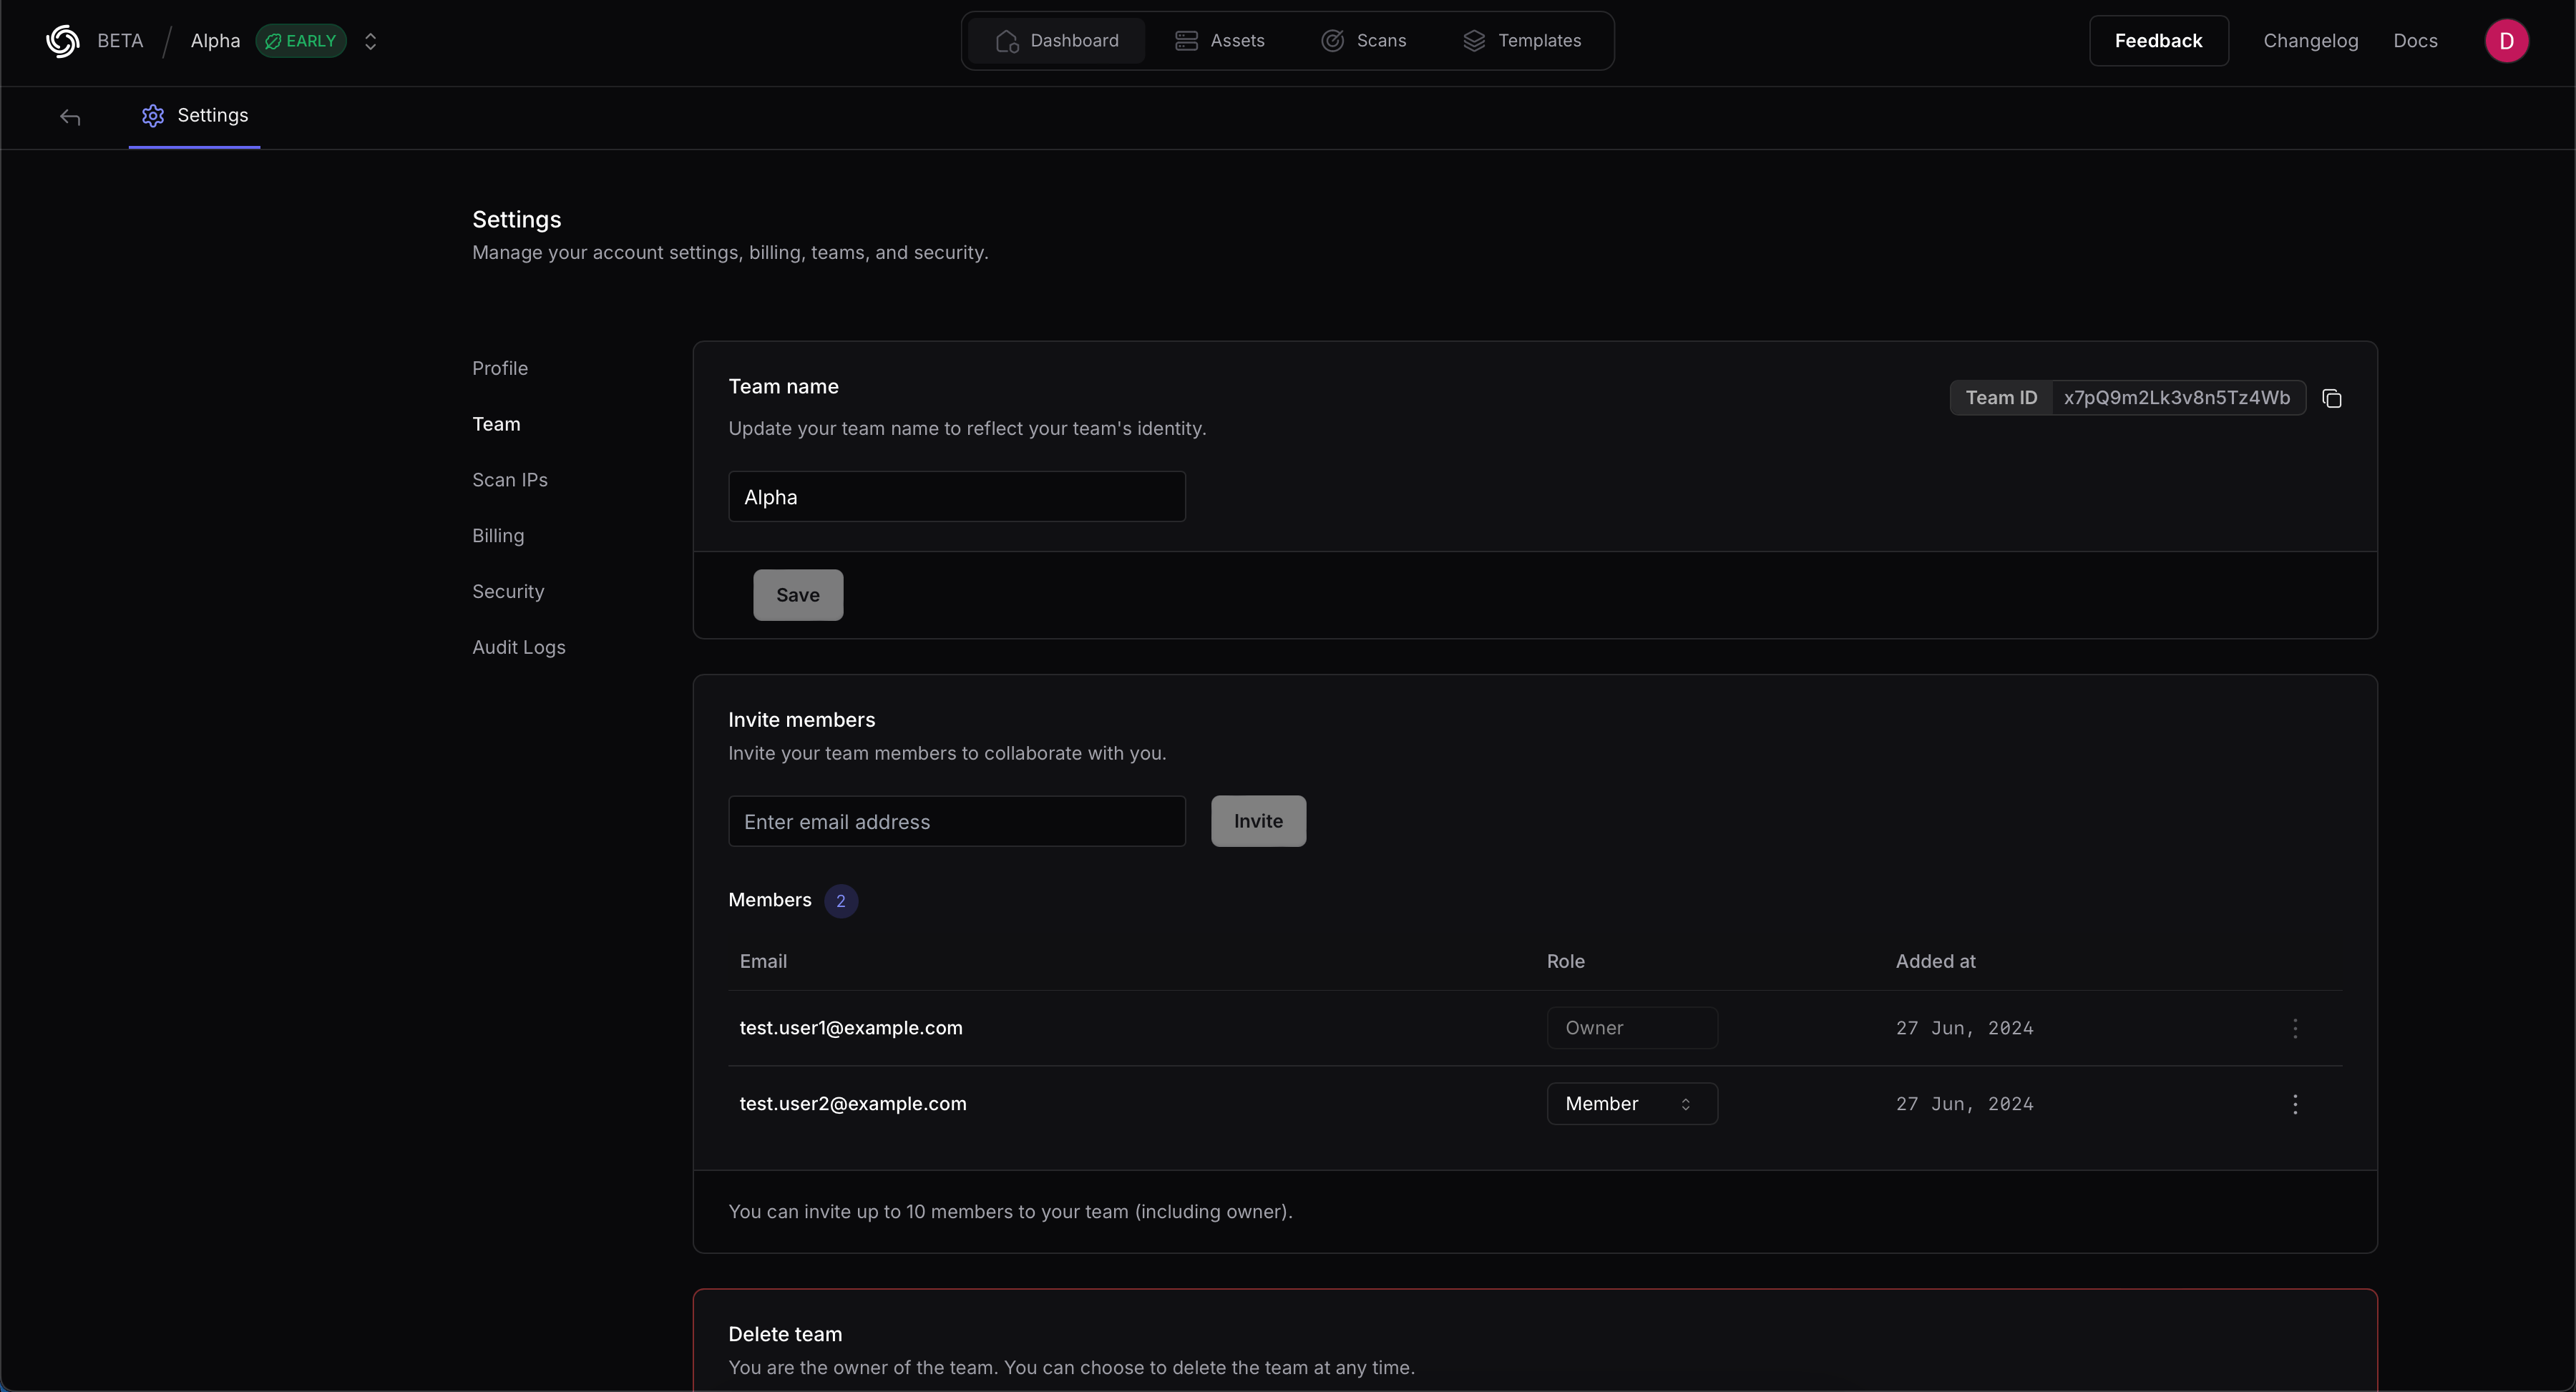
-
CLI Option:
-
ENV Variable:
- Run your scan with the upload flag:
This method is ideal when you want to maintain complete control over scan execution or integrate with existing automation scripts.
Safety Considerations
Internal ranges include hardware that public-facing scans never touch: printers, badge readers, PLCs, VoIP phones, and other embedded devices. Most run minimal firmware, and some do not fail safely when probed. Decide for each category below whether it is in scope with those side effects accepted, or excluded.- Printers and MFPs: Prefer banner grabs, SNMP reads, and version fingerprinting over templates that submit print jobs. If they stay in scope, run the scan when IT or facilities is expecting it.
- OT/ICS and building systems: PLCs, HVAC controllers, badge readers, and fire panels can fail unsafely under scanning. Keep these to read-only discovery, with sign-off from the team that owns the physical systems.
- VoIP phones and end-of-life hardware: Desk phones and unpatched appliances break more easily than the rest of your inventory, and recovery often means someone walking to the device.
- Directory services: Credential checks against Active Directory can lock out real user and service accounts. Settle lockout thresholds with your identity team first.
- Network appliances: Firewalls, load balancers, and older switches have finite connection tables. A fast port sweep across a segment can fill one and disrupt traffic unrelated to the scan.
Excluding devices from a scan
- Agent based scanning: Add printer, OT, and appliance ranges to Scan Exclusions under Settings → Scan Exclusions. Exclusions are global, so one entry also covers scheduled and automated scans. Template exclusions work the same way when the range should be scanned but a specific check should not run.
- Local scanning and upload: Nuclei tags its most disruptive templates and leaves them out of default scans; they run only when you request them with
-itags. Narrow the rest with-exclude-templates, or point-tat specific template directories.